
This is not a “come one, come all” post.
This article is for those looking to expand their knowledge of AdWords and take their remarketing campaigns (aka retargeting) and targeting methods to that “wicked smaht” level.
These advanced tools can help you get there.
We’re going to take a deep dive into…
- Remarketing Lists for Search Ads (RLSA): An incredibly potent tool that combines the power of remarketing with your search campaigns (hint — very few advertisers are using this feature, and it’s almost guaranteed to make money for you).
- Affinity Targeting: Google knows what you like, and what everyone else likes. With that knowledge, Google has organized people into groups, giving marketers plenty of behavioral targeting to utilize for your display ads.
- In-Market Targeting: This is another behavioral targeting feature for display ads… and it’s even more powerful than Affinity. In-Market displays who’s “in the market” to buy specific products and services—right now.
Harness the power of these advanced tactics, so you can increase your leads and lower your cost per acquisition (CPA). Like we did for this client:

Not only that, these advanced tactics can help you save time, help you make predictions, and help you draw correlations.
Let’s get started.
Remarketing Lists for Search Ads
RLSA is a way of combining the power of remarketing with your search ads, which will allow you to get more out of the existing ads you’re currently running.
RLSA helps you put your search ads in front of the right people, so you can use people’s previous behavior to make better decisions about the ads you show them and how much you pay for the ads.
Let’s start with how RLSA can get you more out of the existing search ads that you’re already running.
Using RLSA, you can up your keyword bid for those on your remarketing list, which is especially powerful if returning users to your site are more valuable to you and convert more.
(RELATED: The Remarketing Grid: The Science of Ad Retargeting Audience Segmentation)
In this example, let’s suppose you’re paying a $1 for the keyword phrase, “buy xyz online.”
If someone were to click on this ad and visit your site, you’re obviously going to cookie them, and add them to your remarketing list(s).
Now, if this person leaves your site without buying anything and is still searching for “buy xyz online” – as many people do as they continue their research and evaluation – you can up your bid on this person in an effort to bring them back to your site.
So this is how you do it…
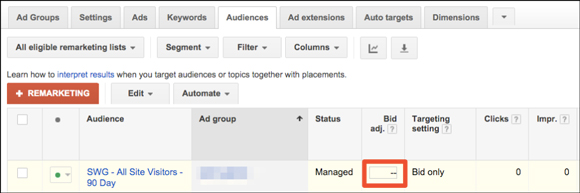
You’ll need to go to the Audiences tab in AdWords, and the first thing you need to do is choose an Ad Group:
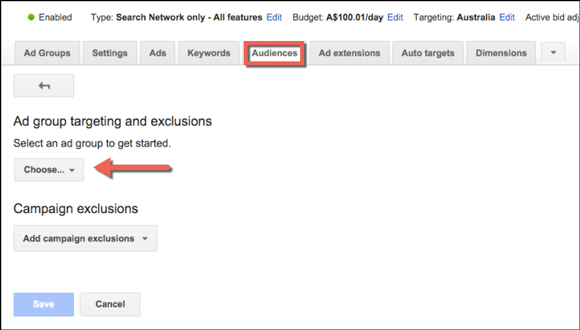
This is one of the most annoying things about RLSA – it’s super powerful, but you have to add one Ad Group at a time.
We’ll talk about AdWords Editor in just a minute because it’s a much faster way to do it.
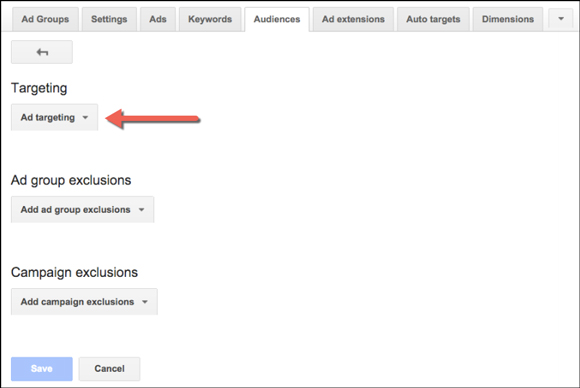
Once you pick an Ad Group from one of your search campaigns, a new screen will come up. The bit we’re interested in is Ad Targeting at the top…
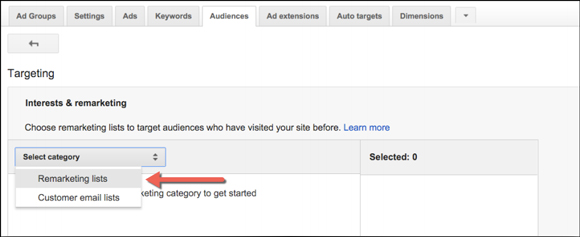
Then you’re going to choose Remarketing from the dropdown list…
Next, you’re going to find and choose from your existing remarketing list(s). And my tip for you, is to use a relatively broad list. Here you can see, we’ve selected All Site Vistitors – 90 Days…
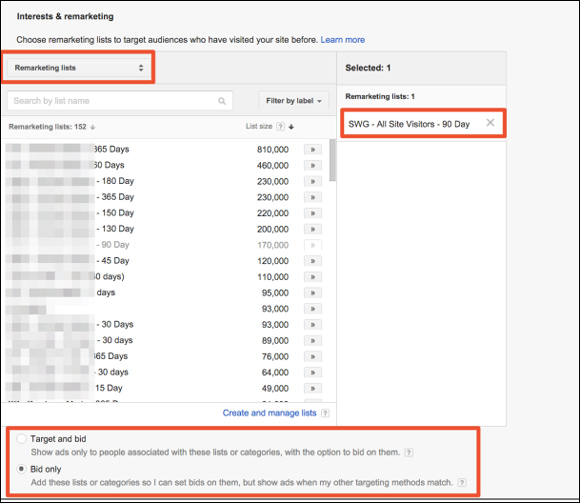
Now, you may know there’s all sorts of remarketing lists that you can set up, but you don’t want to do this when you’re just getting started, and certainly not with RLSA, because it would be too restrictive of a list.
Only a handful of people would be affected by your RLSA campaign.
So you want one narrow thing and one big, broad thing when building your RLSA campaign – the narrow thing being the keywords that you already have, the broad thing being your remarketing lists.
Using “All Visitors 30 Days” or “All Visitors 90 Days” is a perfect place to start.
This is critical: Double check you’ve selected the Bid only setting in the bottom. We’ll take more about Bid only and Target and bid and the differences between the two, but for now, pretend Target and Bid doesn’t exist.
Once you’ve done that, you’ll be back on the Audiences screen, and here you can see the audience that was just added.
The next step is to set a Bid Adjustment (a.k.a. bid modifier).
It’s really good practice to set Bid Adjustment straight away, even if you just put in 0%. Setting a Bid Adjustment is a good way to check that you’ve got everything set up properly.
Selecting 0% tells AdWords to do nothing different.
AdWords will split your traffic in half – it’s going to show ads to everybody that’s not on the remarketing list and bid (let’s say) a $1, and it’s going to show your ad to everybody that’s on your remarketing list and do exactly the same thing: Bid $1. At 0%, you’re getting two lines of data, and you can check if your ad is working and set up correctly.
As you start to see more data, you can start to increase your bid accordingly.
I’d suggest a conservative Bid Adjustment would be between 10-50%. For instance, if you raised your bid to 25%, a $1 becomes $1.25 towards your retargeting list.
Google would have you do 100% or 200% Bid Adjustment, in other words, double or triple your bid for those returning customers. I’d wait until you’ve got a little bit of data to back that up – is a returning customer really worth 3X as much to you?
Let the data tell you how aggressive you should be with your Bid Adjustment.
Now, rolling out RLSA when you have lots and lots of ad groups is a real pain in the you-know-what because you have to make this change and go through the above steps I just described for every single Ad Group.
And we’ll talk about…
How to Set Up RLSA with AdWords Editor
If you have more than one ad group, AdWords Editor is almost a necessity.
AdWords Editor will save you hours and hours of time by allowing you to set up your RLSA in bulk, and it will help you get more out of the existing ads you’re currently running.
Just know, AdWords Editor does have a learning curve, but it’s worth learning. If you aren’t familiar with Editor, I’d suggest you do go to their Help Center before you start applying this method.
In AdWords Editor, you’ll see this…
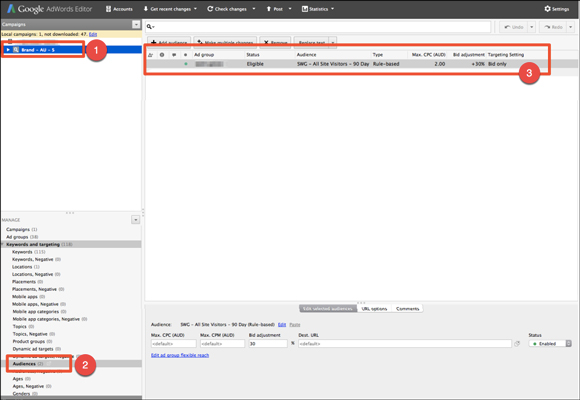
- In the top left corner, we have a list of campaigns, and whatever campaign you highlight there is the one you’re working on.
- In the bottom left, you’ll choose the type of entity you want to work with. (We’ll continue to use Audiences in our example, like we did in the previous one.)
- On the right hand side in the larger screen is where you do the work in AdWords Editor.
So what I’ve done in the example above, and what I suggest you do, is set up the first RLSA Audience in the interface.
Next, I opened AdWords Editor and downloaded the recent changes, and then I see, under the Audiences tab, what was just created in the interface.
This is a good starting point because it helps orient yourself instead of attempting to create it all from scratch in Editor.
Now we’re going to add an audience by clicking Add Audience at the top…

We choose the ad group(s) – 38 in this case – we’re going to add our audiences to…

Hit OK. Now, you’ll add the remarketing list.
You can choose more than one list, but we’re only using one for this example. In this case, it was All Site Visitors – 90 Days…

Now, all that’s left is to set your Bid Adjustment…

In under a minute I’ve added 38 Ad Groups. I can highlight all of them and set the bid for all of them at once. That’s the power of Editor.
So we’ve just gone through the steps to add an ad group to audience and set the Bid Adjustment.
The final step requires making a little change. You’ll go to Ad Groups, in the left corner above Keywords and Targeting, and then highlight all the ad groups in the right hand window…
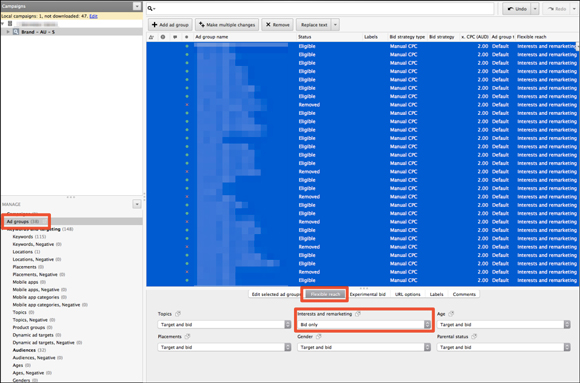
Go to second tab and click Flexible Reach. And you’re going to change Interests and remarketing to Bid only.
The Bid only setting is applied at the ad group level, so it’s not connected with the audience. You add the audience to all the ad groups you want to, and then you need to “flip the switch” at the ad group level. That’s it.
Another great thing about Editor is it has a safety net.
Anything you’ve done in Editor that you want to go live must first be sent back to AdWords by selecting post your changes. If you don’t post your changes, it will stay in Editor, so you can’t break anything while you’re in Editor.
Before I get into other ways to use RLSA, how do you go about…
Measuring Success
If you’re going to apply RLSA to your campaigns, you need to know what to do next – you need to know how to read the numbers, and how to report the numbers back to your client or back to your boss.
We’re going to take a look at a purchase for a brand campaign with four different audiences…
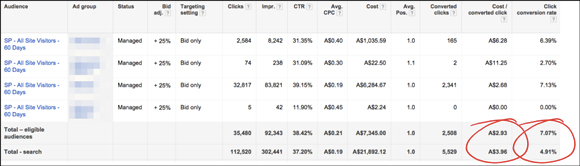
But what do all these numbers mean?
Take a look at what I’ve circled in the bottom right. The left number, $2.93, that’s the CPA for our remarketing search ads. The number under that, $3.96, is the campaign as a whole. Our RLSA conversion rate is represented by the first number on the right, 7.07%.
For the campaign as a whole, the conversion rate was 4.91%.
This looks great! It looks like we’ve got a conversion rate increase of 48%, and we’re saving about a buck on every lead that we’re driving in.
But there’s data missing here.
Until you understand this you really won’t see the power of RLSA, and you’ll be doing yourself a disservice when you report the numbers. That’s because campaign as a whole is made up of two different groups: The remarketing audience that we increased our bid for combined with the rest of the audience you’re targeting.
What we don’t yet know is: What’s the actual data for that NON-Remarketing audience?
You’ll have to split it apart and do the math manually to get your true number.
The campaign as a whole received 5,529 leads, which you can see in the Converted Clicks column. You’ll subtract Total – Eligible Audiences (2,508) from Total – Search (5,529).
5,529 – 2,508 = 3,021
So 3,021 leads came from people that haven’t been to our site before. (Our NON-remarketing lists if you prefer.)
If you separate the data out and do the math, you actually find the conversion rate for the 3,021 is 3.9% and they actually cost $4.82.
So the real improvement by adding the Remarketing Audiences in, is from $4.82 down to $2.93.
And we’ve improved the conversion rate from 3.9% to 7.07%.
Those are the numbers you’ll want to report to your boss or client!
Now, I want to talk about a few options for…
Target and Bid with RLSA
Target and bid works differently than Bid only, so if you’re new to this, start with Bid Only. You’re less likely to break anything.
Let’s go through three use cases.
1. “Top of Funnel” (TOFU) Keywords
TOFU keywords are very broad, very generic keywords, like “TV” or “Costa Rica.” They’re keywords that don’t show intent, and generally are keywords you don’t bid on because they don’t help your ads convert.
However, if a person has been to your site, and then does a broad, TOFU keyword search that’s related to your business, then it may be a good time to target them with your ads.
This strategy can work because the prospect has been to your site and is familiar with you.
For instance, let’s say you sell TVs and there’s a prospect that’s been to your site before. If the prospect is in the market for a TV and does a TOFU keyword search that triggers one of your ads, then the prospect is more likely to click on your ad because they’re already familiar with you.
By using Target and bid, you’re saying to Google: Only target people with these TOFU keywords if they’re on my remarketing list; if they’re not on my remarketing list, don’t show them an ad. Then you could set your bid amount ($1, for example).
To use this strategy, I’d advise setting up a new campaign. Pick broad, but relevant, TOFU keywords you’re not currently using. Set Target and bid, and test it.
2. Change Ad Copy
You can use Target and bid to show different ad copy to someone that’s already been to your website.
Let’s say you’re in the cleaning industry, and someone has been to your site, but they didn’t book an appointment.
If they’re still in the market for a cleaner, which you’ll know based on their keyword searches, instead of bidding more for returning visitors you could change your ad copy to, “Still need a cleaner?” and target that person on your remarketing list.
“Still need a cleaner?” is direct and will probably speak to a person who’s still searching for a cleaner.
The only way to change the ad copy is to set up a new campaign and use the Target and bid option. This will allow you to show this ad to the targeted people on your remarketing list.
For this new campaign, if you like, you can use the same keywords from the previous campaign that got the prospects to your site in the first place.
3. Competitor Terms
Within the Google system, you can go after any keyword, trademarked or not.
You just can’t use those trademarked keywords in the copy, nor can you use deceptive and misleading copy and pretend to be that competitor. But, if you can get an honest ad in front of a lead that’s about to go to your competitor, you can grab a little bit of your competitor’s traffic and bring it over to you.
This strategy generally converts very, very well. Competitor Keyword Campaigns are usually the second most profitable terms you can run (with Brand Campaigns being the first most profitable).
However, the challenge with running Competitor Terms is that they have a very low click through rate (CTR) and therefore a low quality score (QS). This causes you to pay a high cost per click (CPC) with a low impression share.
In other words, Google wants to charge you more and show your ad less because it knows you’re not really relevant for that term.
To improve your low CTR and high CPC on Competitor Terms is to use RLSA and the Target and bid option.
Limit your competitor ads to only show to those on the remarketing list. When the cookied (a.k.a. pixeled) lead searches for your competitor, show them your ad. Because these people already know you, and because you’re only showing your ad to a small group, your CTR is pretty decent. Thus, your quality score goes up, and your cost is very good.
Using RSLA to Exclude Audiences
You can use your remarketing list to stop showing ads, as well. That’s something that previously had not been possible.
How do you do that? How do you stop showing ads to select audiences? It’s very simple to set up.
In AdWords, go to the Audiences tab and scroll down to Campaign exclusions, and choose Remarketing lists from the drop down menu…
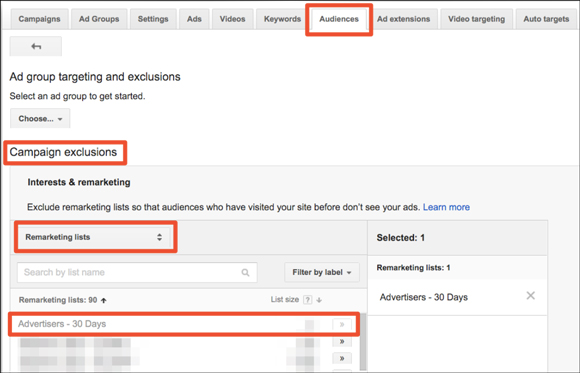
In this case, our client has an advertiser portal on their website. So we know that anyone that goes to the advertiser center is an advertiser, and we don’t want to show them paid ads. So we’ve added this exclusion to every search campaign, and we stop showing ads to these people.
Google Shopping Ads
You can combine RLSA with your Google Shopping Campaigns, and it’s super simple to do.
(RELATED: Selling Physical Products? Scale Up With These 6 Google Product Listing Ad (PLA) Tips)
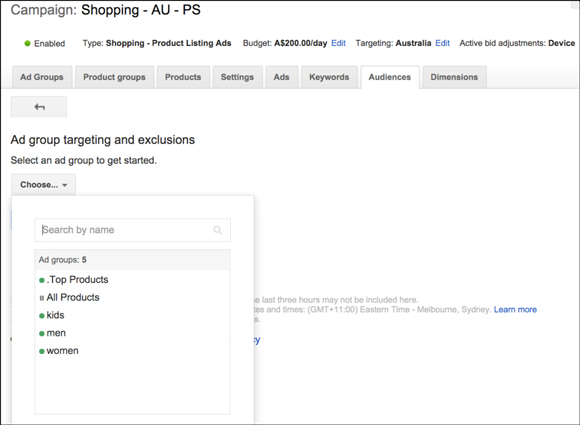
In the Shopping Campaign you’ll start out in the Audiences tab. You pick an ad group. In my experience, most people only have the one ad group, All Products. The example below has multiple ad groups because that’s how we’ve set up this campaign for this client…
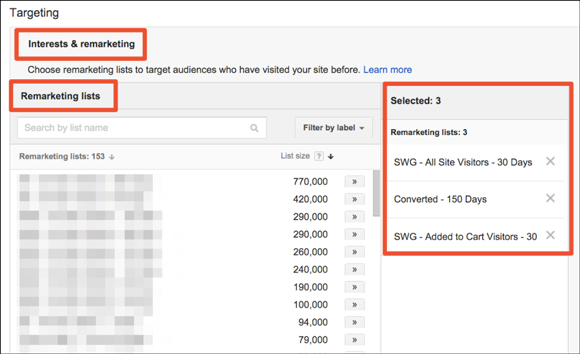
Pick your ad group, then select Remarketing (at the top) and add which ever remarketing lists you want to treat differently. In the screen shot below, you’ll see I’ve picked a few remarketing lists…
And finally, choose Bid only.

In this case, it’s key that you select Bid only. If you choose Target and bid, your ads will only show to those who have been to your website, which is generally not a good thing because Shopping is typically an acquisition strategy. So use Bid only to acquire new blood.
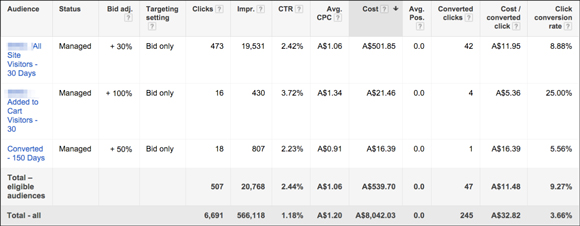
The results of this Shopping Campaign can be found below. This site typically has a conversion rate of 2-3%, but this campaign resulted in an 8.88% conversion rate for site visitors in the past 30 days (All Site Visitors – 30 Days) and a 25% conversion rate on those that abandoned the cart (Added to Cart Visitors – 30)!
Next, I want to talk about…
Using Dynamic Search Ads (DSA) with RLSA
This is a way of automatically showing ads to people that Google thinks are a good match to you based on what’s on your site.
If you’re not targeting a particular keyword, Google will match you to it based on your website, write the copy, set the bid (within reason), for you, and show the ad to the prospect.
It’s kinda a catch all strategy.
DSA will catch things that your current campaign(s) may miss, and it can be incredibly profitable.
You can mix DSA with RLSA. This lets you bid more for all the things you’re about to miss, but for people that are familiar with you and on your remarketing list(s).
If you’re already using DSA campaigns, no need to make a copy of it. Use Bid only when setting up the audience, which will tell Google to keep using the DSA campaign, but now bid higher for returning visitors.
Set it up and give it a try. It’s a powerful tactic.
That’s the final topic I’m going to cover on RLSA. Now we’re going to move on and talk about a couple of behavioral targeting options. Let’s start with…
Affinity (and beyond!) Targeting
Not “infinity,” but “affinity.” Dad joke – couldn’t resist. 😉
In AdWords, there used to be a feature called Interest Targeting. Affinity Targeting and In-Market Targeting, which we’ll talk about in the next section, have replaced Interest Targeting.
Affinity is much like how TV advertising has been sold for years – the audience is broken down into groups of people with similar interests.
The reason they can break audiences down is because Google knows everything about us. They use people’s search behavior, browsing behavior, websites that people visit, where people use their phones, people’s Gmail accounts, and so on. Google does this to show a better quality ad – so that advertising can be informative and not annoying.
Affinity is a long term “interest,” so it’s more about reach than ROI. It’s not about what they’re “watching” right now, but what they “watch” often. I’m still making the analogy to the TV – by “watching” I mean what websites they’re on. Affinity is about behavior that the audience does again and again over time.
Affinity groups are pre-defined segments of audience and these groups include…
- Sci-Fi TV Fans
- Luxury Shoppers
- Avid Investors
- Snowbound Travelers
- American Football Fans
…and many, many more.
Using Affinity will help Google display ads to people who display relevant behaviors to what you’re selling.
You set up Affinity through Display Network. I’m assuming you have an understanding of Display Network, but you can read more about Display Network in this blog post and in AdWords Support.
This is a targeting option that you have for your Display Network Campaign. This is an ad group level setting that can be applied to loads and loads of ad groups using Editor. To set this up, go to Display Network, then Targeting, then Interests & remarketing…

At the time this post was written, there were 106 Affinity audiences to choose from. I’ve made a list of Affinity segments you can choose from in Dropbox, which you can access here. The best thing to do is scroll through the list and see what will work best for your brand.
Even more powerful than Affinity is…
In-Market Targeting
In-Market works similarly to Affinity, and per before, can be found under Display Network in Interests & remarketing. There’s about 500 lists (see the full list here) to choose from with In-Market…

The critical difference between Affinity and In-Market is this is what people are in the market for, right now — roughly in the last 7 to 14 days. People have been searching or browsing for this in the last week or two, and you can target people based on this.
For instance, you can target people who are in the market to buy an Audi. Not just people who are in the market to buy a car, but the brand of the car. In-Market allows you to get specific.
Let’s walk through an example of how you can use this. For this example, I’m using an eCom site that sells contact lenses.
You’ll do this in Google Analytics (and again, I’m assuming you know how to use Google Analytics and that your Analytics is set up properly.
(RELATED TRAINING: How to Master Google Analytics)
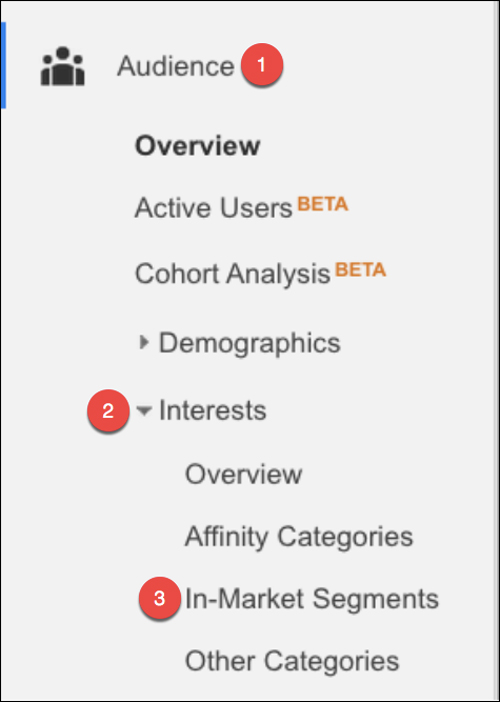
You go to the Audience section inside Analytics, then down to the Interests section, and you’ll see In-Market.
You get a table that looks like this…
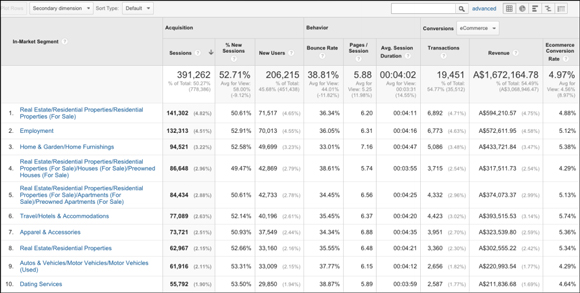
…but it’s not particularly useful. Let’s tidy that up.
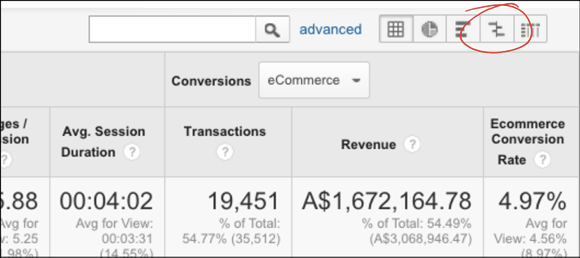
If you go to the top right of the chart, you can click the Comparison Report…
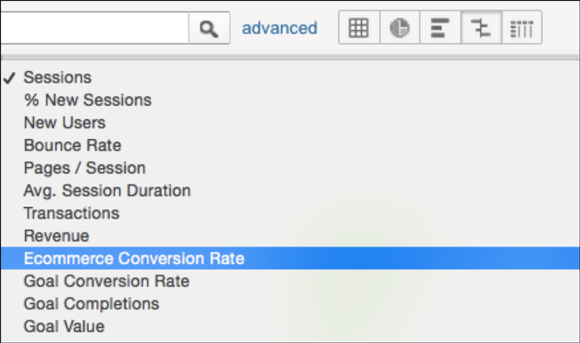
…and from the drop down menu, you can find options that are more useful for your business.
Now we’ll get a much more useful report…
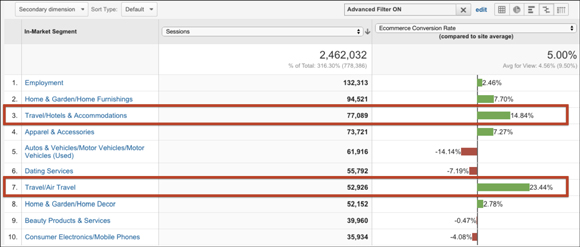
The green lines on the right hand side show the eCom conversion rate compared to the average. The first red box shows a 14.84% better conversion rate compared to the average of 5%.
You have this data right now in your Analytics account. Google is storing this information about your current visitors and telling you what they are in the market for, right now. This allows you to see patterns and correlations with people who have visited your site.
Through this In-Market report, we discovered that people who buy contact lenses from this client were also in the market for travel – just before people went on trips, they stocked up on contacts. Blindingly obviously in hindsight, but we had never thought of this before.
So what can we do as a result of that?
We can target people who are in the market for travel, and we can show them an ad like, “Traveling soon? Need to stock up on contact lenses?”
Now, not all of the people traveling will need contact lenses, but for those who are in the market for both travel and contact lenses, that will be a compelling ad. We could even bid differently and target people who have been to our website using the RLSA tactics discussed above.
Powerful.